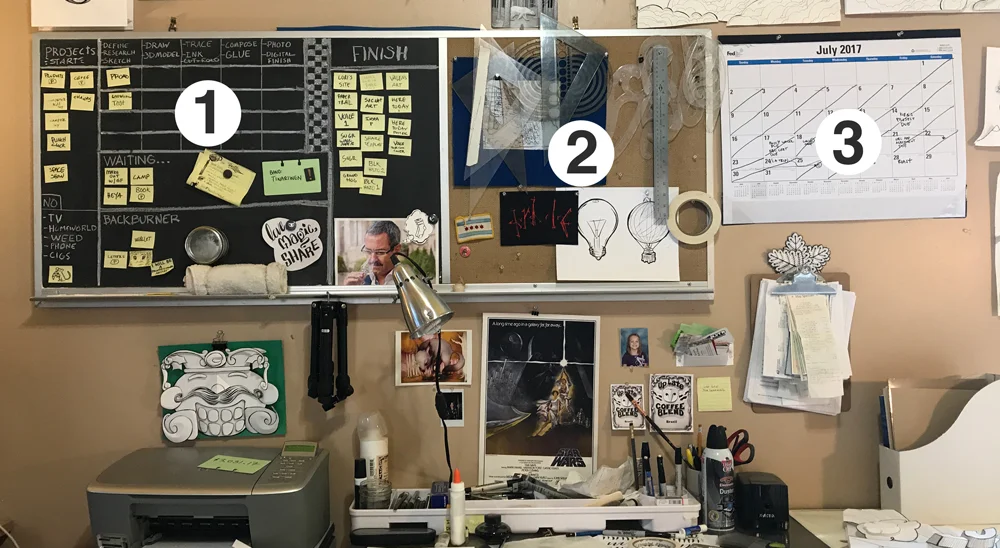
Keeping track of what your working on, if your working on multiple projects, can be tricky. I keep everything above my desk, it's easy to glance up to check my progress when I need to. It's also racing themed for speed. I'll try to explain how it works, and hopefully, it will give you some ideas for your own system. Designing your own system isn't that hard, and I think I'll write a post on how to design one in the future.
The System
1. The Job Board: The workhorse in the system is the job tracking area. I use a chalk board because it's easy to erase areas and replace them when necessary.
2. Art supplies: The nice thing about having a chalk board with a cork board attached to it is I can store my rulers, triangle, and french curves above my desk.
3. The calendar: This is the best way I've seen to track due dates. If there is a better way, I'm not using it and I don't care.
1. Project list: When I have a project, I write the name of the project (or a shorthand version that I can understand, that would fit) on a post-it note and put it in the projects section. This is where I start. If I am looking for something to work on, I pick one and put it on the board in the next section.
2. Project stages: I have 5 basic stages for every project.
The research stage: This is the first stop on the journey. it invlovles these steps; define the problem or project, research the appropriate topics involved, sketch out thumbnails. This is where I try to understand what a project is about, and come up with ideas.
The drawing stage: This is where I start drawing out what I want to make full size, or build parts in 3D software to make templates for parts of a piece.
Cutting and Inking: This step involves alot of tracing on the light table, cutting out pieces, inking, and folding. It's the most labor intensive part of the process.
The composition stage: This is where I start composing the piece and pasting them together. It is probably the most satisfying stage of the work.
Finishing stage: I photograph the piece and load it into photoshop to color and touch up the art for digital.
The staging area is not linear. If a mistake is made, or something needs to be added, the post-it notes travel backwords to a previous stage if necessary.
3. Waiting...: This space is for projects that are waiting for approval, or something else.
4. Backburner: This is for projects that I decide to work on later. They go from this space to a list in my notebook. If I'm ever stuck on what to work on next, I visit this list to see if there is anything I might want to pick up again.
5. The Done area: The finish line. Time to get a drink and relax. Filling up this space is very motivating.
6. Love Magic, and Share: My guiding principles. I may write something about this at a later time.
7. The connoisseur: He judges my finished projects. His disdain for my work keeps me motivated to make better stuff and get better. I hate him.
I hope this gives you a few ideas for your personal system. You don't have to make it as elaborate as mine.


